Tuesday 27 April 2021

UiAutomator Watchers

 What are watchers? 

Watchers are basically used for capturing the ANRs and other UI related issues. We will discuss in detail which issues are been captured using these watchers. It Provides auxiliary support for running your test cases. 

There could be a situation when a UI Selector could not find a match for a particular action. At this point of time we can register watchers.

Register watchers

When a selector can not find a match, uiautomator will run all registered watchers.

Click target when conditions match

Let us understand what the above line means

d.watcher("WATCHER_NAME") : This will create a new watcher.

.when(condition) : condition for the watcher

.click() : The action to be perofomed once the target uiselector has been found

Next question arises that whatever watcher we have registered has been called or not.

watchers triggered

A watcher is triggered, which means the watcher was run and all its conditions matched.

Returns true if specified watcher triggered, else returns false

Remove watchers

Let us remove named watchers


List all watchers


Check all triggered watchers

Reset triggered watchers

Remove all watchers


Force run all registered watchers


Monday 18 November 2019

Data Driven Testing Framework in Selenium Webdriver with python scripting

What is Data-driven Testing Framework?

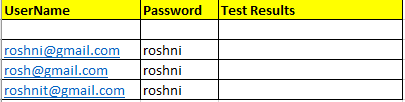
In a data-driven testing framework, a set of data is created in an excel sheet, and those set of data are imported from an excel sheet to testing tool for testing.

For example, I have taken the www.myntra.com as my demo site for which I will be performing some data-driven test for sign in.

To Sign in a manual user have to follow below steps:
1. Enter www.myntra.com
2. Click on Profiles
3. Click on LOG IN
4. Enter Email address and password
5. Click on LOG IN button


Same we will do using selenium data-driven test framework. For repetitive login we will use excel sheet with email address and passwords.


So first step will create a XLUtil.py file which will import data from excel to automation framework ie. it will put on the website

import openpyxl

def getRowCount(file,sheetName):
    workbook = openpyxl.load_workbook(file)
    sheet = workbook.get_sheet_by_name(sheetName)
    return(sheet.max_row)

def getColumnCount(file,sheetName):
    workbook = openpyxl.load_workbook(file)
    sheet = workbook.get_sheet_by_name(sheetName)
    return(sheet.max_column)

def readData(file,sheetName,rownum,colnum):
    workbook = openpyxl.load_workbook(file)
    sheet = workbook.get_sheet_by_name(sheetName)
    return sheet.cell(row=rownum,column=colnum).value

def writeData(file,sheetName,rownum,colnum,data):
    workbook = openpyxl.load_workbook(file)
    sheet = workbook.get_sheet_by_name(sheetName)
    sheet.cell(row=rownum,column=colnum).value = data
    workbook.save(file)

So in XLUtil.py,
1. getRowCount method will get the max row count
2. getColoumnCount method will get the max column count
3. readData method would read the data from the particular cell
4. writeData method would write the data to a particular cell

Below is the snippet for the login.py

import XLUtils

from selenium import webdriver
from time import sleep
from selenium.webdriver.chrome.options import Options
from selenium.webdriver.common.keys import Keys

# For pop up alerts of webpage
option = Options()
option.add_argument("--disable-infobars")
option.add_argument("start-maximized")
option.add_argument("--disable-extensions")

# Pass the argument 1 to allow and 2 to block
option.add_experimental_option("prefs", {
    "profile.default_content_setting_values.notifications": 1})

driver = webdriver.Chrome(chrome_options=option, executable_path=
                          'chromedriver.exe')
driver.maximize_window()

driver.get('https://www.myntra.com')
assert 'Online Shopping for Women, Men, Kids Fashion & Lifestyle - Myntra' in 
            driver.title

search_box = driver.find_element_by_class_name("desktop-searchBar")

# Login to the website
profile = driver.find_element_by_class_name("desktop-userTitle").get_attribute
                                           ("data-reactid")
print profile
driver.find_element_by_class_name("desktop-userTitle").click()
sleep(1)
print driver.find_element_by_link_text("LOG IN").get_attribute("text")
login = driver.find_element_by_link_text("LOG IN").click()
sleep(1)
assert 'Login' in driver.title

path = "C:\Data\Roshni\selenium_Framework\Myntra_app_automate\details.xlsx"
rows = XLUtils.getRowCount(path,'Sheet1')

for r in range(2,rows+1):
    username = XLUtils.readData(path,'Sheet1',r,1)
    password = XLUtils.readData(path,'Sheet1',r,2)

    # On login page use email and password to login
    # Enter email text field
    print driver.find_element_by_class_name("login-user-input-email")
                                            .get_attribute("name")
    driver.find_element_by_class_name("login-user-input-email")
                                            .clear()
    driver.find_element_by_class_name("login-user-input-email")
                                            .send_keys(username)
    driver.find_element_by_class_name("login-user-input-email")
                                            .send_keys(Keys.TAB)
    sleep(2)

    # Enter Password text field    
    print driver.find_element_by_class_name("login-user-input-password")
                                                     .get_attribute("name")
    driver.find_element_by_class_name("login-user-input-password")
                                                     .clear()
    driver.find_element_by_class_name("login-user-input-password")
                                                     .send_keys(password)
    sleep(1)

    # Press Log In button    
    print driver.find_element_by_class_name("login-login-button-container")
                                             .get_attribute("text")
    driver.find_element_by_class_name("login-login-button-container")
                                             .click()
    sleep(2)
    if driver.title == "Online Shopping for Women, Men, Kids Fashion & 
             Lifestyle - Myntra":
        print("Test Passed")
        XLUtils.writeData(path,'Sheet1',r,3,"Test Passed")

        # For logout
        profile = driver.find_element_by_class_name("desktop-userTitle")
                                   .get_attribute("data-reactid")
        print profile
        driver.find_element_by_class_name("desktop-userTitle").click()
        sleep(1)
        driver.find_element_by_xpath(
            "/html/body/div[1]/div/div/header/div[2]
                  /div[2]/div/div[2]/div[2]/div[2]/div[3]/div/div").click()
        sleep(5)

        # Login to the website
        profile = driver.find_element_by_class_name("desktop-userTitle")
                         .get_attribute("data-reactid")
        print profile
        driver.find_element_by_class_name("desktop-userTitle").click()
        sleep(1)
         print driver.find_element_by_link_text("LOG IN").get_attribute("text")
        login = driver.find_element_by_link_text("LOG IN").click()
        sleep(1)
        assert 'Login' in driver.title

    else:
        print("Test Failed")
        XLUtils.writeData(path, 'Sheet1', r, 3,"Test Failed")

sleep(5)
driver.quit()

So in login.py,
1. We import the XLUtil.py as we are going to call the methods related to Excel
2. Launch the www.myntra.com.
3. Click on profile
4. Click on login
5. Enter email address and password
6. Click on login

So far email address and password, we are importing those values from excel and then writing on website, if user login, then the test is pass which is written in excel sheet with writeData(). If the login fails then Test failed is written in excel sheet as a test result of the test.

Test Automation Frameworks

What is the Test Automation Framework?

It is a set of guidelines used for designing and creating the test scripts. These guidelines include the coding standards, concepts, processes, practices, project hierarchies, modularity, reporting mechanism, test data injections etc. to pillar automation testing. A framework should be scalable and maintainable.

Advantages of Framework:

  1. Reusability of code
  2. Maximum Coverage
  3. Easy Reporting mechanism
  4. Minimal manual intervention
  5. Low-cost maintenance
Types of Test Automation Framework
  1. Linear Scripting Framework
  2. Modular Testing Framework
  3. Data-Driven Testing Framework
  4. Keyword Driven Testing Framework
  5. Hybrid Testing Framework
  6. Behaviour Driven Testing Framework


Let us start with Data-driven testing framework in detail with selenium + python as scripting language

Tuesday 10 September 2019

Framework Using APPIUM with Python scripting

Why Mobile automation?

As the world is moving towards the more use of Mobile rather than using the desktop or laptop for any stuff like shopping, banking etc. For more information about mobile automation check here

How to automate Mobile app?

In today's world we need everything on mobile and the apps installed on device should be much more efficient to help us. Like you want to do shopping, so in this case the app should be responsive, with interactive UI's and should be able to handle the load of multiple users at same time. There are so many things which need to be taken care when you are automating an application. So in this we will consider functionality testing. We will consider dialer app of a smartphone, which is considered to be mostly used by user.

Basic concepts required for automation:

Before jumping directly to coding let us understand few concepts. I have considered Dialer app using page object model

So what exactly is Page Object in automation world? It is nothing but modulating our code page by page instead of writing everything in a single code. This way representation of code is easy to manage and easy to understand.

Appium basic concepts are required to be understood before moving further. You can go through here

Pre-requisite:

You need to install below setups on your system

  1. Python 2.7 (stable version)
  2. PyCharm Community Edition 
  3. Appium standalone server
  4. Selenium
  5. Appium Client

Installation documents are available here

App for Automation:

We have choose Dialer app for the automation. We will basically automate an android platform app.
To automate any app in appium we have to first find appPackage and appActivity
So the question here is how to find the appPackage and appActivity of an application. There are two methods to figure out this
1. By using adb command

adb shell
shell@LS-5016:/ $dumpsys window windows | grep -E mCurrentFocus|mFocusedApp'

2. By using aapt dump badging command

Detail about this could be found here

Inspecting element:

Once we have decided which app to test and automate, lets see how to automate same using appium. First thing is to launch the appium server which you halve already installed on your machine.There are two ways which you can inspect UI element
1. Using uiautomator
2. Using UI inspector available in appium

Inspecting element using uiautomator detail information is available here

Here we will see in detail about inspecting element using appium inspector.
First step is to launch the appium server

Then we have to start the server

 Step 2 is to start a new session. We need to click on file-> New session window
It will display a new window where we have to set the desired capabilities like as below

And click on Start session button
So here we could see different properties of UI element. For example
If if wish to click on highlighted area it will display
com.android.dialer:id/floating_action_button_container

various actions performed on the element could be found here and various ways to identify elements could be found here

Automation code goes here:

So finally how to put them all together in a code.

webdriver.py
from appium import webdriver

class Driver:

    def __init__(self):

        desired_caps = {
            'platformName': 'android',
            'deviceName': 'LYF WIND7i',
            'appPackage': 'com.android.dialer',
            'appActivity': 'com.android.dialer.DialtactsActivity',
}
self.instance = webdriver.Remote("http://localhost:4723/wd/hub",desired_caps)
 

In this .py file we are mentioning the desired capabilities required for our test.

dialer_screen.py


from appium.webdriver.common.mobileby import MobileBy
from selenium.webdriver.support.wait import WebDriverWait
from selenium.webdriver.support import expected_conditions as e

class DialerScreen:

    def __init__(self, driver):
        self.driver = driver
        self.floating_action_button = WebDriverWait(self.driver.instance, 5).
                                     until(e.visibility_of_element_located
                                     ((MobileBy.ID, "com.android.dialer:id/
                                     floating_action_button")))

    def dial_number(self):
        # Dial a number        
        dial_digit_buttons = self.driver.instance.find_element(MobileBy.ID , 
                                  "com.android.dialer:id/digits")
        dial_digit_buttons.send_keys('number')

    def click_call_button(self):
        press_call_button = self.driver.instance.find_element(MobileBy.ID,
                        "com.android.dialer:id/dialpad_floating_action_button")
        press_call_button.click()

    def click_floating_action_button(self):
        floating_action_button = self.driver.instance.find_element(MobileBy.ID,
                                "com.android.dialer:id/floating_action_button")
        floating_action_button.click()

    def click_end_call_button(self):
        press_end_call_button = self.driver.instance.find_element(MobileBy.ID,
                      "com.android.dialer:id/floating_end_call_action_button")

        press_end_call_button.click()


So here we have written code for the dialer screen as per page object model.

And finally comes our test execution script. Call_from_dialer.py
import unittest
from webdriver.webdriver import Driver
from apps.dialer.dialer_screen import DialerScreen

class DialerTestCases(unittest.TestCase):

    def setUp(self):
        self.driver = Driver()

    def test_dialer_launches(self):
        dialer = DialerScreen(self.driver)
        dialer.click_floating_action_button()
        dialer.dial_number()
        dialer.click_call_button()
        from time import sleep
        sleep(10)
        dialer.click_end_call_button()

     def tearDown(self):
        self.driver.instance.quit()

if __name__ == '__main__':
    suite = unittest.TestLoader().loadTestsFromTestCase(DialerTestCases)
    unittest.TextTestRunner(verbosity=2).run(suite)

So here you could see that,

  • def setUp(self) this method invokes the desired capabilities before we could run the actual test script.
  • test_dialer_launches(self) this method actual have the test steps which need to be carried on in order to execute it.
  • Finally the tearDown(self) method is to quit from the test.

 The file structure would look like

The test result would be as below
To run test simply right click and select run unittest for Call_from_dialer.py


Tuesday 9 July 2019

Ways to identify App Package name and App Activity

app package name and App activity
Why there is need of App Package name and App Activity?

App Package name & App Activity name is required when we are doing automation for a particular app.

For example, if we want to automate dialer app using APPIUM (which I will be covering in upcoming posts) , then you need to have app package name & app activity.

Method 1: By using adb command

This is how we can have app package name and app activity

Dialer App
Fig 1. Select the Dialer app and launch


Dialer app
Fig 2. Dialer App launched
To get the package name & activity name run below command after launching the dialer app
adb shell 
shell@LS-5016:/ $dumpsys window windows | grep -E 'mCurrentFocus|mFocusedApp'
Below will be output on the command prompt

Fig 3. Run above command from cmd prompt
Method 2 : By Using aapt dump badging command

For this method, I have considered Amazon app. First we have to place the apk at given path C:\Users\Administrator\AppData\Local\Android\Sdk\build-tools\28.0.3

Later we can run below command at command prompt
C:\..\AppData\Local\Android\Sdk\build-tools\28.0.3>aapt dump badging "C:\Users\Administrator\AppData\Local\Android\Sdk\build-tools\28.0.3\Amazon Shopping_v18.12.0.100_apkpure.com.apk"
Fig 4. Package name using aapt

Fig 5. App Activity using aapt


Friday 14 June 2019

All about adb shell dumpsys

adb shell dumpsys
What is dumpsys?

This was the word always ticking my head whenever I use to talk to vendors. They always needed this one. So I started reading about it and how it benefited them to resolve the android related issues.
dumpsys : It is nothing but a tool which gives the status of services running on device.

Below is the command which shows the list of all services along with the package name
adb shell service list
Output will be as below

adb shell service list
Fig 1 shell service list

So next question is how to identify the services. So below commands give you list of service
adb shell dumpsys -l
Output will be as below

adb shell dumpsys -l
Fig 2 dumpsys -l
There are many filters which you can use for analyzing the dumpsys data

1. dumpsys activity

It shows the list of activities running at that moment on device
adb shell dumpsys  activity
adb shell dumpsys activity
Fig 3 dumpsys activity


2. dumpsys batterystats

This generates the statistical data for battery usage on device.
adb shell dumpsys batterystats

adb shell dumpsys batterystats
Fig 4 dumpsys batterystats

3. dumpsys cpuinfo

This adb command display the CPU information utilized by device
adb shell dumpsys cpuinfo
Fig 5 dumpsys cpuinfo

Above output you can see that gaana app have utilized 17% of CPU as it was used last.

4. dumpsys wifi

This command displays the status of wifi
adb shell dumpsys wifi
Fig 6 dumpsys wifi


5. dumpsys meminfo

This command displays the memory information of the device
adb shell dumpsys meminfo
Fig 7 dumpsys meminfo

6. dumpsys procstats

This command displays the process stats
adb shell dumpsys procstats --hours 3
adb shell dumpsys procstats
Fig 8 dumpsys procstats
For more on dumpsys refer to https://developer.android.com/studio/command-line/dumpsys

Tuesday 11 June 2019

Troubleshooting - Unable to detect device using adb devices

Unable to detect device using adb devices
There could be many situations where your device connected to system is not detected. Few of the scenarios are explained below. Apart from below scenarios if you face any trouble let us know in comment section.

1. adb devices command doesn't display any result.

For this problem you have to enable the developer option available at Setting -> More settings -> About Phone -> Tap five times on the Software version. A toast message is displayed that "Its in developer mode". Please refer adb devices page for details.
Step 1. Developer Mode selected
Step 2. Developer option is available
Step 3. USB debugging enabled

Once the debugging mode is enabled, now if you fire adb devices command, it will display below as still RSA key is not mapped and device shows us unauthorized


Fig 4. Device Unauthorized


Fig 5. RSA key pop up


Fig 6. Select the option as always


Fig 7. Device detected

2. Device not detected when connected to laptop

There could one reason here that in android 7 onward devices are connected in charge only mode. So you need to select the option from usb charge only to file transfer


 So once the Files mode is selected your device get detected.

3. Device not detected even though its mass storage is detected.

So there are situations in which device internal storage is detected but adb devices command returns nothing. For such scenarios please check below solution. Here we have considered ubuntu OS.

Step 1 : adb devices
This returns nothing

Step 2: lsusb
Once you run this command below result is displayed


Step 3: Check whether adb_usb.ini file exist on your system. In my case it was not available so we will install it with below commands
a. mkdir --parent $HOME/.android
b. wget -O $HOME/.android/adb_usb.ini https://raw.githubusercontent.com/NicolasBernaerts/ubuntu-scripts/master/android/adb_usb.ini
c. vi adb_usb.ini
d. add the device code here and save
e. To save press Esc : wq

Step 4 : Once adb_usb.ini file is downloaded, add the code in the file and save


Fig 1. Downloaded adb_usb.ini


Fig 2. Added the code for mediatek device

Step 5 : Now run the adb devices command. Your device will be detected.

Why this happens?

The android sdk have qualcomm based codes already in the adb_usb.ini file, but for few other chipset it is not available then we have to add manually and save.

Tuesday 4 June 2019

ADB Network Commands

1. adb shell netstat

In computing, netstat (network statistics) is a command-line network utility tool that displays network connections for the Transmission Control Protocol (both incoming and outgoing).
adb netstat command is used for network statistics . This command is usually required to analyse the network statistics for an android device. Below pic shows the actual output of the command

netstat

2. adb shell ping 

PING command returns the network response if the device is connected to INTERNET. Ping command can be used with below options

ping [-c count]
        [-i interval]
        [-I interface]
        [-m mark]
        [-M pmtudisc_option]
        [-l preload]
        [-p pattern]
        [-Q tos]
        [-s packetsize]
        [-S sndbuf]
        [-t ttl]
        [-T timestamp_option]
        [-w deadline]
        [-W timeout]

The output of the adb shell ping command will be as below

ping

Ctrl+c is used to stop the ping command. You can also give give limited lines to be displayed on screen as a result of ping command.

adb shell ping www.facebook.com -c 4
3.  adb shell netcfg

adb shell netcfg command is used to show, manipulate routing, configure and manage network connections via profiles. Below is the result of netcfg command

netcfg
4. adb shell ip

adb shell ip command show, manipulate routing, devices, policy routing and tunnels

ip [OPTIONS ] OBJECT
OBJECT := { link | addr | addrlabel | route | rule | neigh | ntable |tunnel | tuntap | maddr | mroute | mrule | monitor| xfrm |netns | l2tp }

OPTIONS := { -V[ersion] | -s[tatistics] | -d[etails] | -r[esolve] |-f[amily] { inet | inet6 | ipx | dnet | link } |-l[oops] { maximum-addr-flush-attempts } |-o[neline] | -t[imestamp] | -b[atch] [filename] |-rc[vbuf] [size]}

Example: adb shell ip -f inet addr show wlan0
                (show WiFi IP Address)


Adb over Wi-Fi

ADB Network Command
Sometimes its required to do the testing without using usb cable. That means we don't have to keep the device in charging mode but we want to run our scripts. In this case we can use adb over Wi-Fi. Lets see in detail, what is adb over Wi-Fi?

Step 1:
Connect device to system using usb

Step 2:
adb device
This will give you the list of devices connected to system
Result - List of devices attached
            ######## device

Step 3:
adb tcpip 5555
Result - restarting in TCP mode port: 5555

Step 4:
Find out the IP address of the device. Settings -> About -> Status -> IP address

Step 5:
adb connect #.#.#.#
Result - connected to #.#.#.#:5555

Step 6:
Now remove the usb cable and run below command to confirm whether the device is still connected or not

adb devices
Result - List of devices attached
#.#.#.#:5555 device

Monday 6 May 2019

Mobile UI Automation Using Python uiautomator Module

Mobile UI Automation Using Python uiautomator Module

Let's see how we can automate mobile UI using python uiautomator module. It works on Android 4.1 + .
Install python 2.7 on your system.First you need to install uiautomator package


1. How to Automate call functionality using uiautomator.

This is how you identify the element from uiautomator. You have to pick the unique properties like className,packageName,Text,resourceId etc. by using uiautomator.


from uiautomator import device as d
from uiautomator import Device
from time import sleep
import os
def VoLTE_call():
  print("Inside Call Method.")
  call = d(className='android.widget.TextView',
                     packageName='com.cyanogenmod.trebuchet',
                     text ='Phone').click()
  sleep(2)
  dialer = d(className='android.widget.ImageButton',
           packageName='com.android.dialer',
           resourceId='com.android.dialer:id/
                       floating_action_button').click()
  sleep(1)
  dialling_page = d(className='android.widget.EditText',
                    packageName='com.android.dialer',
                    resourceId='com.android.dialer:id/digits')
                                    .set_text(number)
  sleep(1)
  press_call_button = d(className='android.widget.ImageButton',
                    packageName='com.android.dialer',
                    resourceId='com.android.dialer:id/
                                dialpad_floating_action_button').click()
  sleep(5)
  #hold call
  hold = d(className='android.widget.ImageButton',
                    packageName='com.android.dialer',
                    resourceId='com.android.dialer:id/holdButton')
                             .click()
  sleep(5)
  #unhold Call
  unhold = d(className='android.widget.ImageButton',
                    packageName='com.android.dialer',
                    resourceId='com.android.dialer:id/holdButton')
                             .click()
  sleep(5)
  # mute Call
  mute= d(className='android.widget.ImageButton',
             packageName='com.android.dialer',
             resourceId='com.android.dialer:id/muteButton').click()
  sleep(5)

  #unmute call  
  unmute= d(className='android.widget.ImageButton',
             packageName='com.android.dialer',
             resourceId='com.android.dialer:id/muteButton').click()
  sleep(5)
  #speaker on  
  speaker_on= d(className='android.widget.ImageButton',
           packageName='com.android.dialer',
           resourceId='com.android.dialer:id/audioButton').click()
  sleep(5)
  # speaker off  
  speaker_off = d(className='android.widget.ImageButton',
             packageName='com.android.dialer',
             resourceId='com.android.dialer:id/audioButton').click()
  sleep(5)
  press_endcall_button = d(className='android.widget.ImageButton',
                        packageName='com.android.dialer',
                        resourceId='com.android.dialer:id/
                              floating_end_call_action_button').click()
  d.press.home()
#Call The main Method
VoLTE_call()
print(""Your test is completed...")


Friday 3 May 2019

How to Capture screenshot and video using adb commands

adb command There are multiple situations where you want to capture the screenshots or video and store in a folder all programmatically. This is simple and one line adb command that can be used to capture the screenshot and video.

Capture Screenshot:

Please find the below steps to capture the screenshot of an android device

1. Connect device to laptop. To confirm whether device is connected or not, run below command
 2. Screencap is the adb command which is used for capturing the screenshots


3. Once the screenshot is captured, its time to pull out from device to laptop.


The image is pulled on your system.

Capture Video:

Please find the below steps to capture the video of an android device. This is generally required when you want to give steps for reproducing certain issues.

1. Connect device to laptop. To confirm whether device is connected or not, run below command


2. Screenrecord is the adb command which is used for capturing the screenshots


3. Once the screen activities are recorded press ctrl+C to stop the recording.

The video which was captured is stored on sdcard. To pull out the video from sdcard please run below command

Here is simple program that depicts how programatically you can use above two commands
Same way we can also write script for video recording.


Feature Posts

Python Appium - Step by step procedure for capturing screenshot

 Why To capture screenshot? It is as important as your logs. If there is any failure for any test scenario, we can provide screenshot for th...