Showing posts with label adb. Show all posts

Tuesday 9 July 2019

Ways to identify App Package name and App Activity

app package name and App activity
Why there is need of App Package name and App Activity?

App Package name & App Activity name is required when we are doing automation for a particular app.

For example, if we want to automate dialer app using APPIUM (which I will be covering in upcoming posts) , then you need to have app package name & app activity.

Method 1: By using adb command

This is how we can have app package name and app activity

Dialer App
Fig 1. Select the Dialer app and launch


Dialer app
Fig 2. Dialer App launched
To get the package name & activity name run below command after launching the dialer app
adb shell 
shell@LS-5016:/ $dumpsys window windows | grep -E 'mCurrentFocus|mFocusedApp'
Below will be output on the command prompt

Fig 3. Run above command from cmd prompt
Method 2 : By Using aapt dump badging command

For this method, I have considered Amazon app. First we have to place the apk at given path C:\Users\Administrator\AppData\Local\Android\Sdk\build-tools\28.0.3

Later we can run below command at command prompt
C:\..\AppData\Local\Android\Sdk\build-tools\28.0.3>aapt dump badging "C:\Users\Administrator\AppData\Local\Android\Sdk\build-tools\28.0.3\Amazon Shopping_v18.12.0.100_apkpure.com.apk"
Fig 4. Package name using aapt

Fig 5. App Activity using aapt


Tuesday 11 June 2019

Troubleshooting - Unable to detect device using adb devices

Unable to detect device using adb devices
There could be many situations where your device connected to system is not detected. Few of the scenarios are explained below. Apart from below scenarios if you face any trouble let us know in comment section.

1. adb devices command doesn't display any result.

For this problem you have to enable the developer option available at Setting -> More settings -> About Phone -> Tap five times on the Software version. A toast message is displayed that "Its in developer mode". Please refer adb devices page for details.
Step 1. Developer Mode selected
Step 2. Developer option is available
Step 3. USB debugging enabled

Once the debugging mode is enabled, now if you fire adb devices command, it will display below as still 
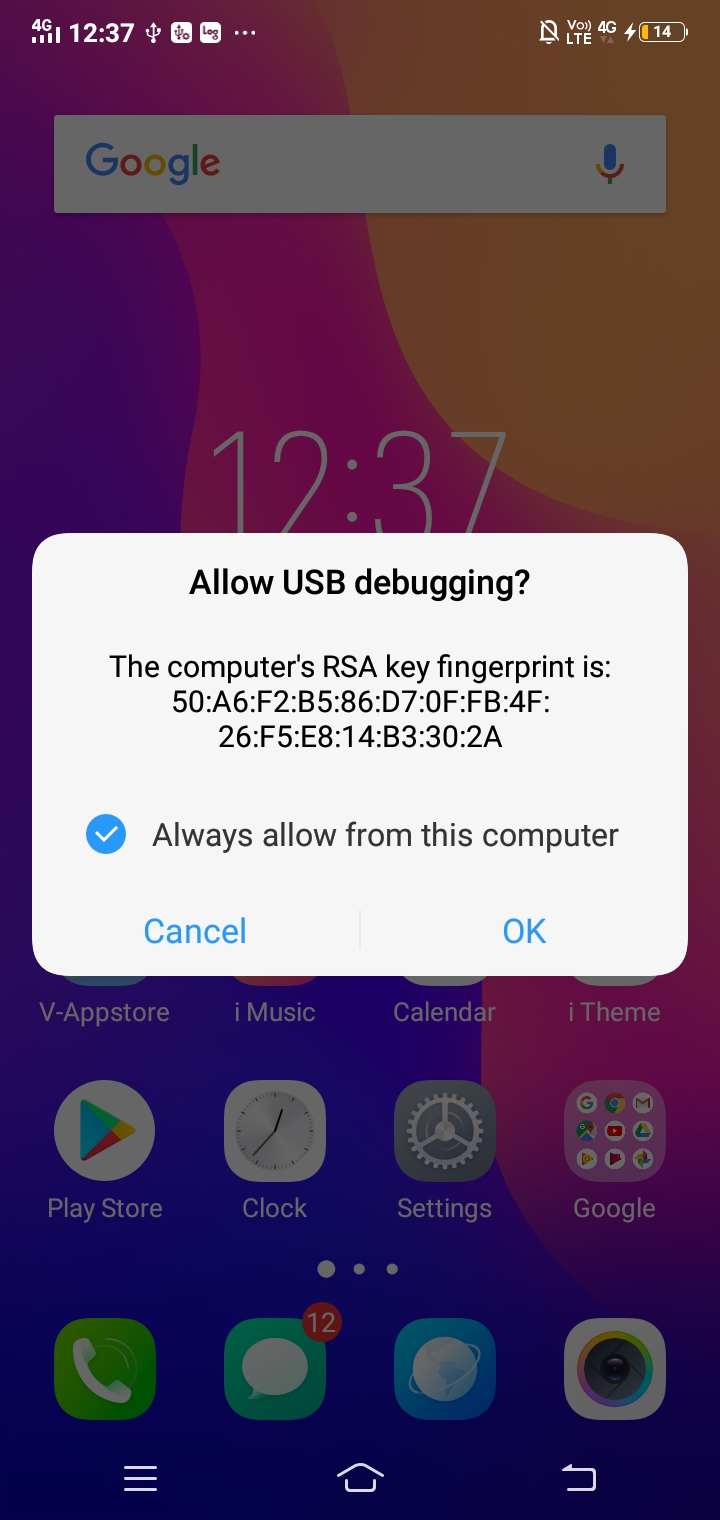
RSA key is not mapped and device shows us unauthorized


Fig 4. Device Unauthorized


Fig 5. RSA key pop up


Fig 6. Select the option as always


Fig 7. Device detected

2. Device not detected when connected to laptop

There could one reason here that in android 7 onward devices are connected in charge only mode. So you need to select the option from usb charge only to file transfer


 So once the Files mode is selected your device get detected.

3. Device not detected even though its mass storage is detected.

So there are situations in which device internal storage is detected but adb devices command returns nothing. For such scenarios please check below solution. Here we have considered ubuntu OS.

Step 1 : adb devices
This returns nothing

Step 2: lsusb
Once you run this command below result is displayed


Step 3: Check whether adb_usb.ini file exist on your system. In my case it was not available so we will install it with below commands
a. mkdir --parent $HOME/.android
b. wget -O $HOME/.android/adb_usb.ini https://raw.githubusercontent.com/NicolasBernaerts/ubuntu-scripts/master/android/adb_usb.ini
c. vi adb_usb.ini
d. add the device code here and save
e. To save press Esc : wq

Step 4 : Once adb_usb.ini file is downloaded, add the code in the file and save


Fig 1. Downloaded adb_usb.ini


Fig 2. Added the code for mediatek device

Step 5 : Now run the adb devices command. Your device will be detected.

Why this happens?

The android sdk have qualcomm based codes already in the adb_usb.ini file, but for few other chipset it is not available then we have to add manually and save.

Tuesday 4 June 2019

Adb over Wi-Fi

ADB Network Command
Sometimes its required to do the testing without using usb cable. That means we don't have to keep the device in charging mode but we want to run our scripts. In this case we can use adb over Wi-Fi. Lets see in detail, what is adb over Wi-Fi?

Step 1:
Connect device to system using usb

Step 2:
adb device
This will give you the list of devices connected to system
Result - List of devices attached
            ######## device

Step 3:
adb tcpip 5555
Result - restarting in TCP mode port: 5555

Step 4:
Find out the IP address of the device. Settings -> About -> Status -> IP address

Step 5:
adb connect #.#.#.#
Result - connected to #.#.#.#:5555

Step 6:
Now remove the usb cable and run below command to confirm whether the device is still connected or not

adb devices
Result - List of devices attached
#.#.#.#:5555 device

Feature Posts

Python Appium - Step by step procedure for capturing screenshot

 Why To capture screenshot? It is as important as your logs. If there is any failure for any test scenario, we can provide screenshot for th...