Friday 14 June 2019

All about adb shell dumpsys

adb shell dumpsys
What is dumpsys?

This was the word always ticking my head whenever I use to talk to vendors. They always needed this one. So I started reading about it and how it benefited them to resolve the android related issues.
dumpsys : It is nothing but a tool which gives the status of services running on device.

Below is the command which shows the list of all services along with the package name
adb shell service list
Output will be as below
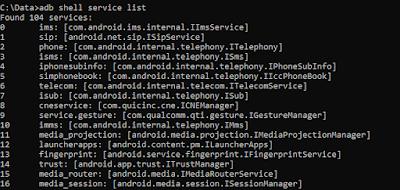
adb shell service list
Fig 1 shell service list

So next question is how to identify the services. So below commands give you list of service
adb shell dumpsys -l
Output will be as below
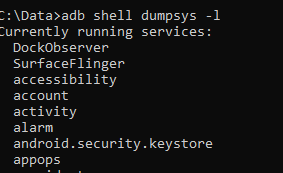
adb shell dumpsys -l
Fig 2 dumpsys -l
There are many filters which you can use for analyzing the dumpsys data

1. dumpsys activity

It shows the list of activities running at that moment on device
adb shell dumpsys  activity
adb shell dumpsys activity
Fig 3 dumpsys activity


2. dumpsys batterystats

This generates the statistical data for battery usage on device.
adb shell dumpsys batterystats

adb shell dumpsys batterystats
Fig 4 dumpsys batterystats

3. dumpsys cpuinfo

This adb command display the CPU information utilized by device
adb shell dumpsys cpuinfo
Fig 5 dumpsys cpuinfo

Above output you can see that gaana app have utilized 17% of CPU as it was used last.

4. dumpsys wifi

This command displays the status of wifi
adb shell dumpsys wifi
Fig 6 dumpsys wifi


5. dumpsys meminfo

This command displays the memory information of the device
adb shell dumpsys meminfo
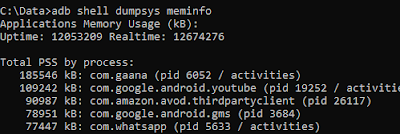
Fig 7 dumpsys meminfo

6. dumpsys procstats

This command displays the process stats
adb shell dumpsys procstats --hours 3
adb shell dumpsys procstats
Fig 8 dumpsys procstats
For more on dumpsys refer to https://developer.android.com/studio/command-line/dumpsys

Tuesday 11 June 2019

Troubleshooting - Unable to detect device using adb devices

Unable to detect device using adb devices
There could be many situations where your device connected to system is not detected. Few of the scenarios are explained below. Apart from below scenarios if you face any trouble let us know in comment section.

1. adb devices command doesn't display any result.

For this problem you have to enable the developer option available at Setting -> More settings -> About Phone -> Tap five times on the Software version. A toast message is displayed that "Its in developer mode". Please refer adb devices page for details.
Step 1. Developer Mode selected
Step 2. Developer option is available
Step 3. USB debugging enabled

Once the debugging mode is enabled, now if you fire adb devices command, it will display below as still RSA key is not mapped and device shows us unauthorized


Fig 4. Device Unauthorized


Fig 5. RSA key pop up


Fig 6. Select the option as always


Fig 7. Device detected

2. Device not detected when connected to laptop

There could one reason here that in android 7 onward devices are connected in charge only mode. So you need to select the option from usb charge only to file transfer


 So once the Files mode is selected your device get detected.

3. Device not detected even though its mass storage is detected.

So there are situations in which device internal storage is detected but adb devices command returns nothing. For such scenarios please check below solution. Here we have considered ubuntu OS.

Step 1 : adb devices
This returns nothing

Step 2: lsusb
Once you run this command below result is displayed


Step 3: Check whether adb_usb.ini file exist on your system. In my case it was not available so we will install it with below commands
a. mkdir --parent $HOME/.android
b. wget -O $HOME/.android/adb_usb.ini https://raw.githubusercontent.com/NicolasBernaerts/ubuntu-scripts/master/android/adb_usb.ini
c. vi adb_usb.ini
d. add the device code here and save
e. To save press Esc : wq

Step 4 : Once adb_usb.ini file is downloaded, add the code in the file and save


Fig 1. Downloaded adb_usb.ini


Fig 2. Added the code for mediatek device

Step 5 : Now run the adb devices command. Your device will be detected.

Why this happens?

The android sdk have qualcomm based codes already in the adb_usb.ini file, but for few other chipset it is not available then we have to add manually and save.

Tuesday 4 June 2019

ADB Network Commands

1. adb shell netstat

In computing, netstat (network statistics) is a command-line network utility tool that displays network connections for the Transmission Control Protocol (both incoming and outgoing).
adb netstat command is used for network statistics . This command is usually required to analyse the network statistics for an android device. Below pic shows the actual output of the command

netstat

2. adb shell ping 

PING command returns the network response if the device is connected to INTERNET. Ping command can be used with below options

ping [-c count]
        [-i interval]
        [-I interface]
        [-m mark]
        [-M pmtudisc_option]
        [-l preload]
        [-p pattern]
        [-Q tos]
        [-s packetsize]
        [-S sndbuf]
        [-t ttl]
        [-T timestamp_option]
        [-w deadline]
        [-W timeout]

The output of the adb shell ping command will be as below

ping

Ctrl+c is used to stop the ping command. You can also give give limited lines to be displayed on screen as a result of ping command.

adb shell ping www.facebook.com -c 4
3.  adb shell netcfg

adb shell netcfg command is used to show, manipulate routing, configure and manage network connections via profiles. Below is the result of netcfg command

netcfg
4. adb shell ip

adb shell ip command show, manipulate routing, devices, policy routing and tunnels

ip [OPTIONS ] OBJECT
OBJECT := { link | addr | addrlabel | route | rule | neigh | ntable |tunnel | tuntap | maddr | mroute | mrule | monitor| xfrm |netns | l2tp }

OPTIONS := { -V[ersion] | -s[tatistics] | -d[etails] | -r[esolve] |-f[amily] { inet | inet6 | ipx | dnet | link } |-l[oops] { maximum-addr-flush-attempts } |-o[neline] | -t[imestamp] | -b[atch] [filename] |-rc[vbuf] [size]}

Example: adb shell ip -f inet addr show wlan0
                (show WiFi IP Address)


Adb over Wi-Fi

ADB Network Command
Sometimes its required to do the testing without using usb cable. That means we don't have to keep the device in charging mode but we want to run our scripts. In this case we can use adb over Wi-Fi. Lets see in detail, what is adb over Wi-Fi?

Step 1:
Connect device to system using usb

Step 2:
adb device
This will give you the list of devices connected to system
Result - List of devices attached
            ######## device

Step 3:
adb tcpip 5555
Result - restarting in TCP mode port: 5555

Step 4:
Find out the IP address of the device. Settings -> About -> Status -> IP address

Step 5:
adb connect #.#.#.#
Result - connected to #.#.#.#:5555

Step 6:
Now remove the usb cable and run below command to confirm whether the device is still connected or not

adb devices
Result - List of devices attached
#.#.#.#:5555 device

Feature Posts

Python Appium - Step by step procedure for capturing screenshot

 Why To capture screenshot? It is as important as your logs. If there is any failure for any test scenario, we can provide screenshot for th...